Laila’s Private Lessons with Tabuteau
Winter and Spring of 1943
Ludlow Building Studio, Philadelphia
Lesson 2: January 28, 1943
Hold your right wrist straight, the elbow in. The oboe should be a part of you.
In itself, the oboe means nothing: you should speak. Beautiful phrasing is more about thinking first than anything. Think before you speak or play. Hear the tone in your head before you produce it.
When performing 0-9-0, attack 1 upon coming back as follows: 5-4-3-2-1 / down-up-up-up-down. Play with a dark tone: smooth, not shrill.
When performing separate notes, gauge the space between them. Shorten the space between longer notes. (Decrease the space as notes get shorter and faster.) Play strong!
Practice articulation on one note: 1-2-3-4-5-4-3-2-1. Also hold a single note from 1 to 5 to 1. Then play five notes up and back, slurred and tongued. These should be slurred like one note. Play between the notes. Maintain a perfect legato. Play as if this exercise is the most beautiful music in the world. Scale-wise passages are the most beautiful.
Take in more reed and hold the oboe further down on your lower lip. Say ta, not blah. Don’t sound like air coming out of a balloon.
Be ready to play: silence and then a tone starting out and then going back to silence is most-beautiful. Silence, that is to say quiet, is important.
Just create more and more disturbance in the air: gradually not suddenly. Play nine notes up and down beginning from low notes. Don’t hold high notes like D. Be every bit as particular in practicing, as at a lesson.
Have something to say, not just moving your fingers, and having it sound like an oboe. When the oboe talks, it means nothing.
Lesson 3: February 4, 1943
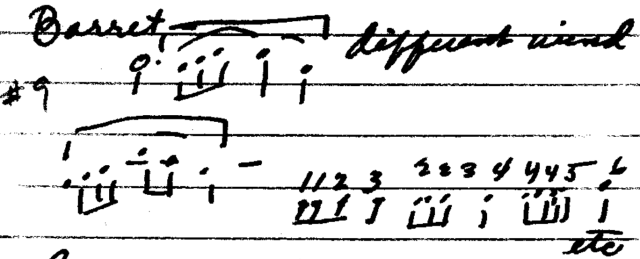
Change separated notes with the wind:
Don’t pump the wind into the notes. No matter how many notes you play, do it with the continuation of the wind, like bowing on a violin.
Practice 1-9-1 going from A (B-C-D-E-F-G-A) to Bb on 9 and back to A. When performing A to Bb, circle back, diminishing to A. Perform this exercise on every note from low C upward. Do not force the air from 8 to 9. Never force, take it easy.
Start with ta on the scrape [tip] of the reed and increase the air maintaining the same quality of sound. Do not force for volume. Be conscious of what you are doing. Analyze how you finish the last articulated note. Practice the attack. Don’t play with a sandpaper-in-the-eyes tone.
Leave more wood in the back of your reeds. Use a long lay (not so thin). Try making your reeds without a wire.
Most oboists have too much technique.
These are Tabuteau’s secrets which he should not tell. In fact, and this is a new method of teaching. These things will make you different.
Remember: the further up you are able go, the further down you will be able to go.
Lesson 4: February 11, 1943
In connecting notes, float like an eagle, don’t flap like a duck. Hold the final attacked note as long as possible letting air escape through the nose. Don’t pinch!
In articulating from middle C to high D utilizing 1-9-1, proceed from 1 to 8 attacking high D on 9 with ta, then proceed downward to the final C at 1. Also, play this exercise slurred. Adjust the embouchure to play the final note, middle C. Then, play 13 notes up and down, beginning on low C, then low D♭, then low D. Also play this exercise chromatically.
Try to begin on low B♭ and low B at a relative pianissimo both slurred and tongued and arpeggiated.
Have the air pressure set before you start to play, like pressure in a faucet. Analyze what you do when it is good, so you can be sure.
Play with a dark smooth tone (velour, like velvet, not scratchy sandpaper) by holding the reed down against the lower lip.
On a rainy day play major scales.
High D (on 9) must continue, not forced, where 8 (C) leaves off.
Every reed is different. You must change your embouchure to accommodate. For low B♭: relax and use the tip of the reed to obtain bite in the tone quality.
There must be a mile between 1 and 0 at the bottom of the 1-9-1-0 series.
Lesson 5: February 18, 1943
Play 1-13-1 diatonically from low E to B and back to low E, attacking on 13 and 1 and pausing between 12 and 13 at the climax of this phrase before coming back down. Make your graduations closer, don’t crescendo so soon. Practice this exercise detached first, then slurred.
Scales: C major & A minor, D♭ major & B♭ minor, D major and B minor. Do each twice, up and down. Chromatic scale from low C to high E, detached and slurred.
Don’t jerk going to C♯; play smoothly. Don’t force the air. Change the position of the embouchure when going for high notes. Always breathe after 1. Don’t play like a stairs, but like a spiral.
Barret Short Exercise 1: Play in slow motion, then a tempo. Always keep the wind behind you.
Barret Melodies 1 & 2: They must always be beautiful. You must be refined to be a good oboe player.
Don’t play high notes like the sound made by ventriloquist Edger Bergen’s dummy, Charlie McCarthy.
Tabuteau has found something in playing the oboe: making every note different.
Lesson 6: March 4, 1943
Scales: Major E♭, E, F; Minor C, C♯, D. First time separate, second time legato. Include chromatic scale.
Barret Short Exercises 1, 2, 3, 4: Change the embouchure on high and low notes. Prepare on the note before the following one.
Barret Short Exercise 1: Increase each group on the way up.
Barret Short Exercise 2: Group as follows: 1, 1-2, 2-3, 3-4, up to high C. They are like joints (phalanges) here, but then a straight arm results. Eventually the line will sound smooth, not crippled.
Barret Melody 1: Transpose up to D♭ major.
Barret Melody 2: Transpose down to B major.
Barret Melody 3: Don’t mention (accent or pronounce) certain notes; they are like silent unpronounced letters. When leading G-F-A-D, press G to F for legato.
Lesson 7: March 11, 1943
Playing with feeling means nothing; beautiful phrasing is control, knowing just what you are going to do, placing each note. You must go up before you can come down. Dust is already on the floor; can it go down any further?
In a upward slur between two notes, for example E to B, every in-between note, F, G and A, must be there. Play from the bottom of your toes to the top of your head, not from the neck up!
In playing scales, practice inflection (variety) of tone etc. in different intervals, especially minor scales. Accent the dominant on the way down. Play [the third] major in major, minor in minor.
Change embouchure when going from third-register D to E♭.
Scales: G♭ major, G major, A♭ major, chromatic.
Barret Short Exercises: 5, 6, 7, 8.
It is better to practice a few notes carefully then then a thousand incorrectly, especially on the oboe.
Your reeds are scraped too thin on the sides: you must have the same smooth quality playing loud as you do playing softly.
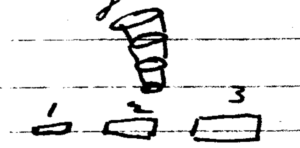
The following is a diagram of a plane-ing board for pre-gouging. The plane is on top:
The above planing board is Tabuteau’s own invention, he never imitated his teacher, Georges Gillet, in this regard.
Tabuteau reports that now, in March of 1943, he has 10 pounds of cane in the trunk [rectangular box on the floor of his studio]. He will jump out the window if the war goes on for 10 more years, since as of December 15, 1942, he has not been able to make any reeds from it.
You are not the only one who plays a lot of notes. You must group the notes correctly. Good playing is intelligent control, knowing just what to do in order to make each note interesting and different.
Lesson 8: April 1, 1943
Don’t pinch the reed. Make thicker sides; the reed should have as little vibration as is possible.
Scales: 5-4-3-2-1 with the impulse on 3; lean on 5 to 4 and 2 to 1. Hold 1 as long as possible.
Chromatic scale: 5-4-3-2-1 low E to low C.
Everything in Tabuteau’s teaching is based on numbers. Place the notes like the measurements on a micrometer. When playing octaves (low C to C), place all the energy in the low note. Do not use force or just jump to the high note. Do not pinch the reed or jerk. This is the same for any interval. Play between the notes; don’t just apply the key. Give air!
Don’t wiggle the left thumb. This is necessary for a good tone. Just move or roll the thumb onto the octave key for octaves. And finish 5-4-3-2-1. No matter what the notes are, the wind is always the same: up on 2, down on 1.
In Barret’s Short Exercises: You are playing just the opposite of what should be done. You must play the legatos long and the staccatos short.
Tabuteau’s new musical system could revolutionize the teaching of music. Many oboists imitate Tabuteau but without the basis. That is Tabuteau’s secret and what makes his playing sound different. Every note is placed.
Take hold of a note; it is like lifting the hair of the bow onto the string to begin.
Lesson 9: April 8, 1943
Hold your arms (elbows) out: forward, not back.
In playing a note: push forward, not down to the floor. Play a pianissimo 10 blocks away. Play far away.
Barret Melody 3:
Before measure 1: Everything must be in the lower note; then play to the upper one but don’t force it.
Measure 9: Measure the turn evenly.
If you are musically correct, Barret’s marks do not matter.
Lesson 10: April 15, 1943
Don’t play long notes short and short notes long!!!
Your [open-hole Loree] oboe is good.
Turn in the middle of a group of notes: go in a different direction
Play from the stomach muscles.
Barret Melody 4:
Measure 1: In ¾ time the dot of the first quarter note comes on the second beat.
Measure 4: Accent the second beat.
In the combination of four eighth notes: three slurred, one staccato; the third slurred note must be long, the staccato on the final note is short. Likewise in the combination two slurred, two staccato: the second slurred note must be long, the final two notes short.
Lesson 11: April 22, 1943
Your whole future depends on learning this articulation correctly: In playing two notes on the same pitch, the stress comes on the second, the repeated one.
Hold back the wind more. Remember up and down [bows]: always drive to the down. Broaden within the tempo.
In playing octaves: the upper note must be more intense with faster vibration.
Slide up and down on the reed as one does on the strings of a violin from the fingerboard to the bridge.
In scraping the reed, don’t take too much from the middle; take more from the sides. The reed must respond easily. The tip should not be thick. Do not bite the reed at all; control it by using your embouchure: flexibility not rigidity.
Always practice scales in this manner: three diatonic scales and then the chromatic scale. Notes must always come out, no matter what you must do to get them. You must have more freedom: swing in accented passages.
Don’t give your opinion and don’t say: Ho-K.
April 26, 1943 Curtis Audition
Barret Melody 10
Lesson 12: May 12, 1943
Use numbers. Travel on long notes to make them interesting. Give more on high notes: play full, not thin and weak.
Barret Melody 9:
Barret Melody 8: Leave space before grace notes. Play the grace notes on the beat. In an ascending interval, play up. Break groupings of notes as if they are phalanges. Don’t play same, same, same.
[Barret Melody 9]: Don’t slip early into the quarter-note forth beat from the dotted half note.
In playing octaves: everything must be in the lower note. Don’t force for the upper note; just push in your stomach and it’s there.
Try for a heavier reed with a darker, fuller quality; not thin and raspy but instead, with more body.
Don’t play as if you are about to be seasick. Make it lighter, effortless.
Barret Short Exercise 9:
More reed on the high notes. Drive! Line!
Lesson 13: June 11, 1943
The less vibration in a reed, the more resistance, and the more you can control the variety of your expression and color. Try to refine your artistic sensibility. You must first think beautiful and right.
Practice intervals: play downwards as if you were going to a higher note. The speed of the wind must increase, but the embouchure must not pinch the reed. You must travel between notes.
High A: press down with first finger of the left hand.
Barret Sonata 1, First Movement: It must be played evenly.
Measure 1: Practice C to A.
Measure 3: Play C natural in the turn: absolutely even notes. Play F fuller than G.
Measure 4: Take E with the low Bb key for diminuendo.
Measure 5: Play the turn evenly.
Measure 6: Give the dotted quarter its full value.
Measure 7: Play the D in the last triplet long.
Measure 10: Accent the final E
Measure 11-12:
Each note is different. The speed of the wind on high B must be at 4, not loud. C to E: there must be no jerk in the turn, play it smoothly.
Measure 19: Staccato!
Measure 21: Breathe (for God’s sake). It is tiresome.
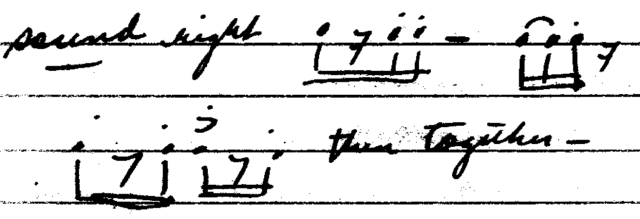
Measure 28-29: Analyze: practice it three ways, then put it together.
It must sound right:
Measure 29: The interval F♯ to A must be solid. Drive! Increase to the end of the phrase.
Take more off the sides of the reed for a darker quality, not wiry or raspy.


